|
|
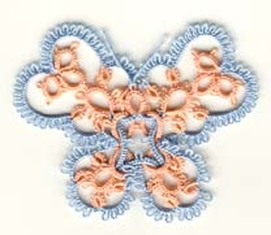
Wally Sosa©2002
Materials:
2 Shuttles
Thread Size 30 in 2 colors
Instructions:
1st Motif
With 2 Shuttles.
Left a small space between rings (1/8"). You'll be joining the 3rd round into this space.
R: 7-7-7-7. CLSR: 7-7-7 / 7. CLSR: 7-7-7 / 7. CLR: 7-7-7+ (to the 1st picot on 1st Ring) 7. CL. Tie and Cut.
2nd Motif
With Shuttle and Ball
R: 3 sp 3 - 3 sp 3 - 3 sp 3 - 3 sp 3 - 3 sp 3. CL RWCH: 10 -10. RW (You can make a variation of a 20 ds chain (no picots) or add as many picot as you want in the chain).R: 3 sp 3 - 3 sp 3 - 3 sp 3 - 3 sp 3. CL RWCH: 8 - 8 RWR: 3 sp 3 - 3 sp 3 - 3 sp 3 - 3 sp 3. CL RWCH: 10 - 10. RWR: 3 sp 3 - 3 sp 3 - 3 sp 3 - 3 sp 3 - 3 sp 3. CL RWCH: 8. RWR: 10 - 10. CL RW (This make the head)CH: 8. Cut and Tie to the base of 1st Ring.
Insert the 2nd motif thru the 1st motif.
Outer Round
With Shuttle and Ball
All the Rings joins will be to the Small Picots in the previous round.
R: 5 + (to the 1st sp of the big 9-Picots Ring) 5. CL RWCH: 2 (- 2) x 5. RWR: 5 + 5. CL RWCH: 2 (- 2) x 15. RW
Clover: R: 5 - 5 - 5 - 5. CLR: 5 + (to previous Ring) 5 + (to the Big Ring) 5 - 5. CLR: 5 + (to previous Ring) 5 - 5. CL RW
CH: 2 (- 2) x 15. RWR: 5 + 5. CL RWCH: 2 (- 2) x 5. RWR: 5 + to the last sp of the big 9-Picots Ring) 5. CL RW
CH: 2 - 2 - 2 - 2. Join to the space between Rings of the 1st motif.CH: 2 - 2 - 2 - 2. RW
R: 5 + (to the 1st sp of the 7-Picots Ring) 5. CL RWCH: 2 (- 2) x 5. RWR: 5 + 5. CL RWCH: 2 (- 2) x 5. RWR: 5 + 5. CL RWCH: 2 (- 2) x 5. RWR: 5 + 5. CL RWCH: 2 (- 2) x 5. RWR: 5 + (to the last sp of the 7-Picots Ring) 5. CL RW
CH: 2 - 2 - 2 - 2. Join to the space between Rings of the 1st motif.CH: 2 - 2 - 2 - 2. RW
R: 5 + (to the 1st sp of the 7-Picots Ring) 5. CL RWCH: 2 - 2 - 2 - 2 - 2 - 2. RWR: 5 + 5. CL RWCH: 2 - 2 - 2 - 2 - 2 - 2. RWR: 5 + 5. CL RWCH: 2 - 2 - 2 - 2 - 2 - 2. RWR: 5 + 5. CL RWCH: 2 - 2 - 2 - 2 - 2 - 2. RWR: 5 + (to the last sp of the 7-Picots Ring) 5. CL RW
CH: 2 - 2 - 2 - 2. Join to the space between Rings of the 1st motif.CH: 2 - 2 - 2 - 2. RW
R: 5 + (to the 1st sp of the big 9-Picots Ring) 5. CL RWCH: CH: 2 (- 2) x 5. RWR: 5 + 5. CL RWCH: 2 (- 2) x 15. RW
Clover: R: 5 - 5 - 5 - 5. CLR: 5 + (to previous Ring) 5 + (to the Big Ring) 5 - 5. CLR: 5 + (to previous Ring) 5 - 5. CL RW
CH: 2 (- 2) x 15. RWR: 5 + 5. CL RWCH: 2 (- 2) x 5. RWR: 5 + to the last sp of the big 9-Picots Ring) 5. CL. Cut and Tie.
Cut a little piece of thread (about 3 inches), fold it in 2 and tie to the picot in the head for the anthenas.
